Learn how brew kombucha at home using a SCOBY and black tea. Complete with instructions on how to properly do a secondary fermentation. Rejoice in the art of naturally fermented probiotic drinks!

What is Kombucha:
If you’re new to kombucha, here’s the skinny: kombucha is a naturally fermented probiotic drink which can aid in digestion and gut health, increase energy naturally, and can create PH balance in your digestive tract.
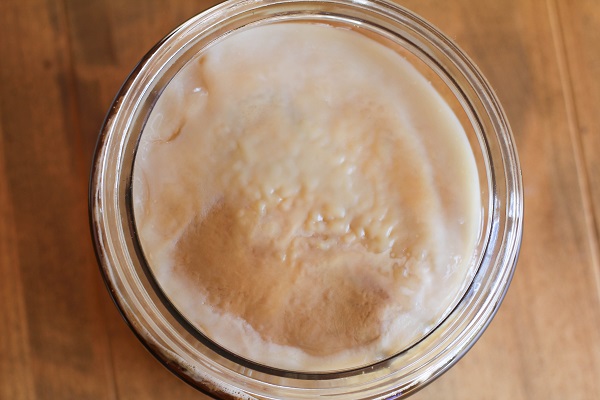
Similar to yeast or yogurt cultures, kombucha is made from a living organism called a SCOBY, which stands for Symbiotic Culture of Bacteria and Yeast. It grows, multiplies and ferments which means it is very important to make sure the SCOBY stays clean and healthy.
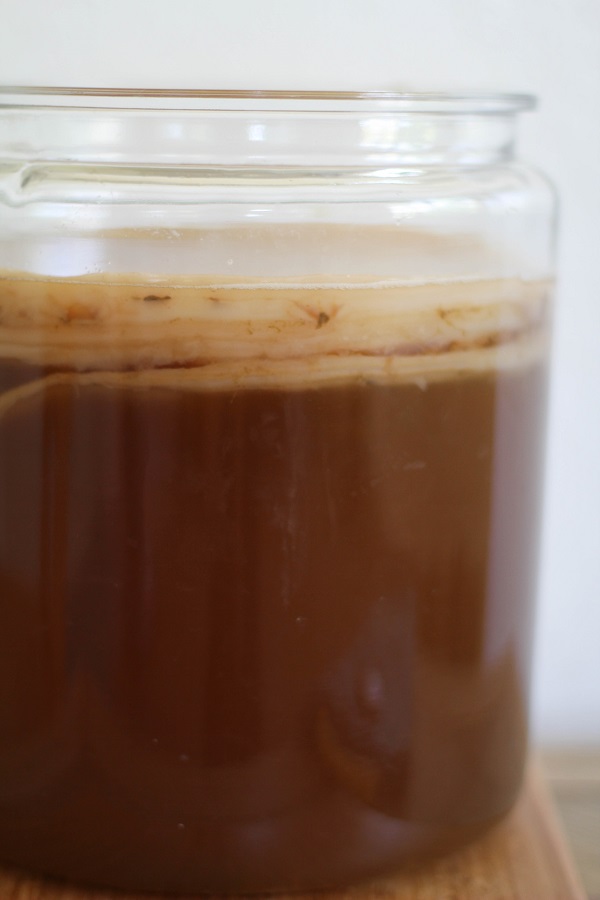
The photo above is what a healthy SCOBY looks like.
Health Benefits of Kombucha:
What’s the buzz about probiotics? They help maintain healthy microflora in your gut, which ensure efficient digestion and aids in nutrient absorption. They help you get the most out of the food you eat.
Probiotics prevent bad bacteria from attaching to the intestinal wall, which starves them of the nutrients they need to survive.
This strengthens your immune system and fights disease.
People who suffer from digestive ailments such as Crohn’s Disease, Celiac Disease, ulcers, Irritable Bowel Syndrome, Candida, etc. may find their symptoms improve with regular consumption of probiotic-rich food and drink.
Kombucha has also been known to boost your immune system (since it populates your system with good bacteria and rids your gut of bad bacteria), your energy level, and even your metabolism.
Probiotics and kombucha have been linked to mental health, as new research shows your brain health is linked to your gut health.
This fizzy beverage is also rich in folic acid, enzymes, amino acids, antioxidants, and Vitamins B1, B6, and B12. In addition, kombucha contains small amounts of zinc, copper, iron, and manganese.
A Cautionary Note
Making homemade kombucha can be risky if you are not careful. If you are new to making kombucha, please seek multiple how-to sources before making a batch.
It is very important to keep all instruments used in the process of making kombucha clean and to keep the SCOBY healthy.
Use common sense and make kombucha at your own risk. If you see a single spot of mold (from what I hear mold on kombucha looks similar to bread mold), abandon ship – throw out your whole SCOBY and discard all kombucha liquid.
Please read instructions very carefully before starting a batch of kombucha. Kombucha is not for everyone.
When you first read the how-to, it may seem long and complicated. The first go-round definitely requires attention to detail, but once you get the hang of it, it’s quick and easy and saves you a TON of money since buying kombucha from the store can cost between $2.50 and $4.00 per bottle.
Please read all instructions thoroughly at least twice before starting a batch of kombucha to ensure you get the best results.
What do I Need to Brew Kombucha?:
Below is a list of the ingredients you need to brew kombucha tea, followed by a list of tools you will need.
- 1 Kombucha SCOBY (we bought ours online)
- 1 Gallon spring water (we buy ours from the store in gallon jugs). Don’t use water from your faucet because it probably has chlorine and/or fluoride in it
- 10 black tea or green tea tea bags (choose pure black or green tea that doesn’t include any additional flavors, orange peels, oils, etc.).
- 1 cup organic cane sugar
Other things you will need:
- Large pot for boiling water
- Large (1-gallon or 2-gallon) glass jug/container
- Distilled White Vinegar
- Long-handle spoon for stirring
- Stick-on or floating thermometer
- Cheesecloth
- Large stretchy rubber band – I use the rubber bands that come around vegetables from the grocery store.
- Some type of heating device, such as a heating pad (only necessary if your house does not stay above 70 degrees F)
- Space blanket (again, only necessary if your house does not stay above 70 degrees)
- A large pitcher or an efficient method of transferring the kombucha from the jug to bottles or the dispenser you will be using to drink the kombucha out of.
- Small fine metal strainer (we use a metal coffee strainer)
- Sealable glass bottles, such as EZ Flip Cap Bottles
Alright, those are the items you need! Once you have everything, you can get started!
How to Brew Kombucha:
- Sanitize EVERYTHING you’re using to make kombucha. You can do this by running it through the dishwasher, hand-washing in very hot water, or by coating it in distilled white vinegar. We keep the jug we use for brewing sanitized by hand-washing it and pouring about ½ a cup of white wine vinegar in it and sloshing it around.
- Boil water. If you are making 1 gallon of kombucha, you do not need to boil the entire 1 gallon….just enough (1/2 gallon or so) to brew the tea.
- Once water has reached a boiling point, remove it from heat and add tea bags. Steep for 15 minutes. Remove tea bags, add the cane sugar and stir well.
- Allow the tea to cool to roughly 75 to 80 degrees F (or if you only boiled half a gallon of water, add the remaining half gallon of cool water so that the hot water cools faster).
- Transfer the cooled tea to a sanitized glass jar or jug. I like using a 1-gallon glass jug, but if you want a smaller batch to start out, you can use a large mason jar.
- Once the tea is in the 75 to 80 degree range, carefully place the SCOBY in the jug with the tea along with all of the liquid that came with your SCOBY. If you have less than 1 cup of starter liquid, you can buy an Original (unflavored) kombucha from the grocery store and add half of it to the tea. Having this starter liquid will help your kombucha brew, as it will colonize the tea with already live and active probiotics and yeast. For your first batch of kombucha, the SCOBY may fall to the bottom of the jug – this is normal. Towards the end of fermentation, it will likely float to the top. Note: if this is your first time making kombucha and you bought your SCOBY online, simply remove it from its package and slip it in the tea along with all of the liquid the SCOBY came with.
- If you have a flat sticky thermometer, stick it on the outside of the jug so that you can monitor the temperature.
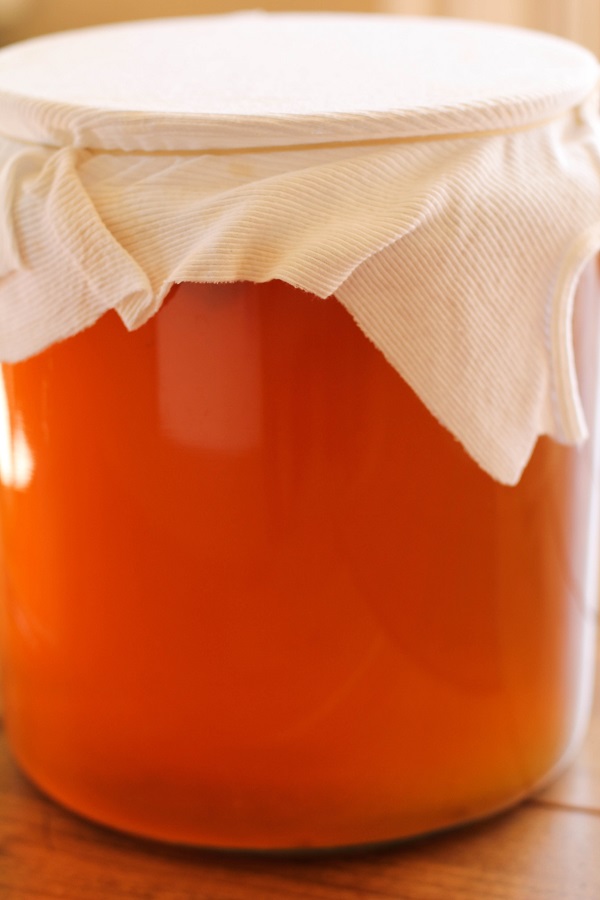
- Cover the jug with cheesecloth bound by a large rubber band so that the kombucha can continually breathe.
- Place jug in a dark place (closet or pantry) that stays relatively warm and is not disturbed by people and light.
- Allow kombucha to brew for 5 to 8 days (the longer it brews, the stronger it is). Be careful not to let it go too long, as it will become too strong for human consumption (and/or the probiotics and yeast will die) if it brews too long.
- Continually check the temperature of the kombucha. It needs to stay in the 70 to 80 degree range for best results. If it falls below 70, it’s not a huge deal, it will just take longer for the kombucha to brew. If the kombucha reaches above 85-degree temperature, you’re running the risk of growing mold on your SCOBY.
- After 5 to 8 days of brewing, your kombucha should be ready! It’s up to you if you want to flavor it or leave it plain. If you choose to leave your kombucha unflavored, you can pour the liquid into a pitcher, leaving the SCOBY with some liquid behind in the jug. You’ll use the pitcher to easily pour the kombucha into bottles for storing the kombucha. If your pitcher is not large enough to fit all of the kombucha in one go, simply do this step in batches. Pour the kombucha from the pitcher into sealable jars (I use flip-cap bottles), seal them up, and refrigerate. Kombucha can be stored sealed in a refrigerator for up to 1 month.
- Cover the jug with the SCOBY and starter liquid with cheesecloth bound by a rubber band and store it in a safe place until you’re ready to brew your next batch. NOTE: If you’d like to flavor your kombucha, you can move on to secondary fermentation (see instructions below).
Kombucha Brewing Tips:
Between batches of kombucha, leave the SCOBY in the jug with enough kombucha liquid to barely cover it, about 1-2 inches of liquid. This liquid will now be considered your “starter liquid,” which you’ll need for each batch of kombucha.
Always keep the jug covered with cheesecloth (or a breathable kitchen towel) bound by a rubber band to keep any bugs out of the SCOBY (if you leave it uncovered, bugs will gravitate toward it).
If you see any mold (it will look like bread mold…green/white and fuzzy circles), discard the SCOBY and the whole batch of kombucha.
You will notice your SCOBY is bigger after the first batch of kombucha – it will grow to the width of the container, and a second SCOBY will form. SCOBYs will always continue to grow with each batch of kombucha. Once a SCOBY gets to be a couple of inches thick, you need to peel off slices in order to keep the SCOBY healthy. You can give these slices to your friends along with some starter liquid so they can start their own batch, or you can discard them.
The SCOBY is fine to sit unused for a few days to a few weeks until you are ready to make another batch – just make sure you keep the jug covered with cheesecloth, and check the SCOBY before starting another batch to be sure it’s mold-free and is still floating in starter liquid. I have had my SCOBY sitting unused for up to three weeks. Just be sure you check on it from time to time.
One of the best parts about brewing kombucha is flavoring it. Once you have finished your primary fermentation, you can either bottle your kombucha and be done, or you can perform a secondary fermentation to flavor it. Here is how to do a secondary fermentation.
Secondary Fermentation:
While secondary fermentation is not necessary in brewing kombucha, this extra step is what enables you to flavor your kombucha as desired, and makes the drink “effervescent” or fizzy.
When more sugar is added to the brewed kombucha, either in the form of 100% juice, fruit, or brewed tea with cane sugar, the kombucha can be brewed again for a second time. The probitoics continue to grow, as they feed off of the added sugar. It is during secondary fermentation that kombucha becomes fizzy!
IMPORTANT NOTE: Secondary fermentation happens without the use of the SCOBY. You do not use the jug with the SCOBY for secondary fermentation. In order to keep your SCOBY healthy, you never want it to come into contact with anything other than brewed tea with sugar. Read all instructions for secondary fermentation very carefully before proceeding.
To put your kombucha through secondary fermentation, follow all of the instructions above, but instead of bottling the kombucha and being finished at Step 13, add your flavorings to the pitcher with the brewed kombucha (NOT the jug with the SCOBY!)
To recap: after your first fermentation is complete, pour the brewed kombucha into a pitcher, leaving the SCOBY with some starter liquid in the jug. Cover the jug with the SCOBY with the cheesecloth bound by a rubber band, and store it in a warm, safe place. You now have your pitcher of kombucha, which is what you will use to move forward with secondary fermentation.
Kombucha Flavor Ideas:
- FRUIT JUICE: Use 100% fruit juice. Combine 1 cup of 100% fruit juice with every 1 gallon of kombucha. Simply pour the fruit juice into the pitcher with the brewed kombucha, give it a stir, then transfer to the bottles.
- FRESH FRUIT AND/OR HERBS: Combine 1 to 2 cups of fresh fruit (berries are especially divine) plus 1/2 cup of cane sugar + 1 to 2 cups spring or well water. Heat the fruit and sugar together on the stove top in order to dissolve the sugar and release the fruit juices. Allow this mixture to cool to room temp before adding it to the pitcher with the pitcher with the brewed kombucha. You can also add fresh herbs here! Once combined, give everything a good stir and pour it into the bottles with the fruit pulp. The fruit pulp will make the kombucha very fizzy!
- BREWED TEA: If you love the original flavor of kombucha but still want to put it through a secondary fermentation, simply brew another batch of green or black tea (tea without any peels or oils works best). Brew 2 to 4 teabags in 2 to 4 cups of water with 1/2 cup of sugar. Allow it to cool to room temperature before combining it with the brewed kombucha.
NOTE: If your pitcher is not large enough to fit both the kombucha and the flavor add-ins, do this step in batches.
Once you have added your ingredients for secondary fermentation to the pitcher with the kombucha, pour the kombucha into glass sealable bottles, seal them tightly, and allow the bottles to sit in a warm, dark place for 3 days, then transfer the bottles (still sealed) to a refrigerator.
When ready to drink, open the bottles carefully (aim them away from your face), as the additional fermentation creates gasses that build pressure in the bottles. Note: Your kombucha will continue to ferment while in the refrigerator, although refrigerating it slows the fermentation process significantly.
If you put the kombucha through a second fermentation, more sediment (and likely a hunk of SCOBY) will grow inside of the bottles. I recommend straining the kombucha before drinking it, to get out any fruit pulp and/or newly grown SCOBY.
A note about sanitizing your jug:
The jug you use for brewing kombucha does not need to be sanitized between batches, but if you’d like to sanitize the jug at some point (just for peace of mind), you can transfer the SCOBY and liquid to a large bowl, then sanitize the jar using white vinegar. Then, transfer everything back over to the sanitized jug.
Here’s a simple photo tutorial on How to Brew Kombucha:
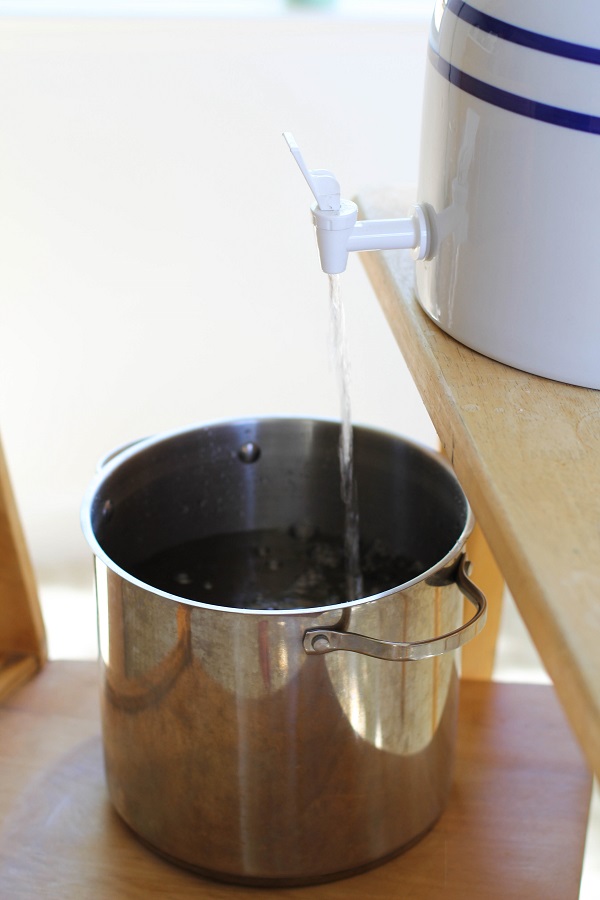
Fill a large pot with spring or well water and bring it to a boil.
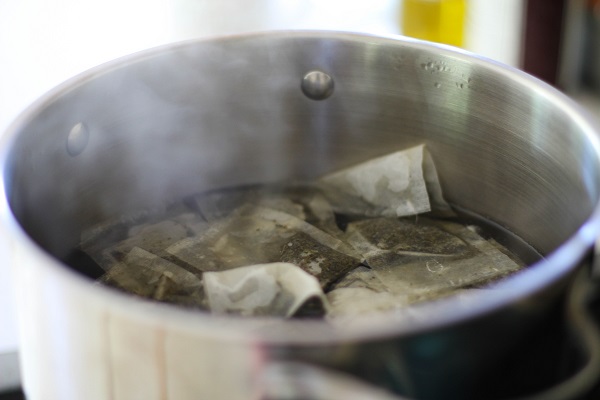
Add the tea bags and allow them to steep.
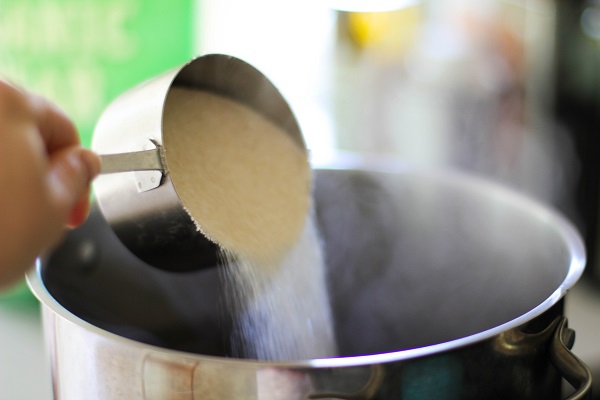
Add the sugar and stir to dissolve. Allow the tea to cool to 75 to 80 degrees F
Pour the tea in a large glass jar and add the SCOBY.
Cover with cheesecloth bound by a rubber band and place in a warm, dark closet for 5 to 8 days. Note: the first batch may take up to 10 days, but every sequential batch should take less time.
Now you’re ready to bottle your kombucha, or to put it through secondary fermentation.
- Apple Cider Kombucha
- Pomegranate Kombucha
- Orange Creamsicle Kombucha
- Strawberry Basil Kombucha
- Grapefruit Rosemary Kombucha
- Apple Ginger Kombucha
- Lavender Kombucha
How to store your SCOBY after a brewing a batch of Kombucha:
After you have brewed a batch of kombucha, you can start the process again by following the same steps! This ensures you have a continuous supply of kombucha and ensures your SCOBY stays active and healthy.
Since we typically brew 1 to 2 gallons of kombucha at a time, we don’t need to continue brewing batch after batch. When I take a kombucha brewing hiatus, I simply leave the SCOBY in the same jar I use for brewing along with plenty of kombucha liquid (I leave about 3 inches of liquid per 1 inch of SCOBY).
Keep the jar covered with cheesecloth bound by a rubber band. Place a bath towel over the jar, and store it in a warm dark place (just like I would do if I were brewing a batch).
If you take a break between batches of kombucha, it may take slightly longer for your next batch to brew because your SCOBY may take a little time to come out of hibernation mode.
I have taken breaks up to 2 months between batches, although I wouldn’t recommend taking much longer than a month off in order to ensure your SCOBY stays alive and happy.
If you’d like more flavoring ideas for your kombucha, and/or if you’d like to learn how to brew other types of probiotic drinks, check out my cookbook, Delicious Probiotic Drinks!
Feel free to leave a comment below if you have any questions! Good luck on your kombucha brewing and remember: fermenting drinks at home is fun, easy, affordable, and healthy!!
For more tips, tricks, information and recipes on kombucha and other probiotic drinks, check out my book, Delicious Probiotic Drinks!!








Iam getting yeast infection which iam not sure if it has any thing to with the kombucha.Has any one else experienced this.And what could I be doing in my fermentation process.
Hi Judy,
I would think the two would be un-related, but I’d check with your doctor. I do know changes in your body’s PH can result in infection, so if your kombucha is very strong and your body is sensitive to pH changes, it could be the kombucha. Still, I’d recommend giving your doctor a call 🙂 Hope all is well and best of luck!
Hi there, I would like to give it a go! Sounds very interesting and exciting and my kids just gulp down the expensive bottled kombuchas in Germany as well. I checked on Amazon and they seem to have different sizes of these scobys. The classic premium is for 3L and is 11 cm wide. There is also a smaller one. Which one are you using? Does the brand matter at all?
Thanks for your help and advice in advance. Gratefully, Anne
Hi Anne, I’m so happy to hear you’re venturing into the world of homebrewed kombucha! The size of the scoby matters when you brew your first batch, as you want to be sure you use the right amount of water according to the size. For smaller scobys, you’ll want to start out brewing just 1 gallon (or even less), whereas if you have a larger, thicker scoby, you can bump it up to 2 gallons. Most scobys that are purchased over the internet come with instructions that tell you the amount of water, tea, and sugar to use on your first batch. I’m a huge fan of Cultures for Health scobys (and other probiotic starter kits): http://www.culturesforhealth.com/ Let me know how your first batch goes!!
Thank you for any other magnificent article.
Where else may anybody get that kind of info in such a perfect means of writing?
I have a presentation next week, and I’m on the look for
such information.
Can you make kombucha without any tea? my husband is moderately sensitive to tea
Thank you
What size tea bags do you use.? family size or the smaller size? I have always been concerned about the tea bag size. Do you let the sweet tea and scoby sit for about 7 days then remove the scoby, and add ginger and etc and let it sit for a few days and then strain it and put more fruit and etc in it again? Mine does not bubble so we have been drinking it plain after about 7 days
Julia, I am very interested in trying to brew kombucha, but the recipes all call for tea, which has caffeine. Would it be possible to brew kombucha using Rooibos (herbal tea)? Thanks.
Susan, I’m so happy to hear you’re interested in brewing kombucha! I wasn’t sure if it was possible to make it using rooibos, but I just googled it, and it looks like you can! In fact, one page I read recommends using rooibos for caffeine-free kombucha, as it comes out with a good flavor. Now I’m thinking I need to give this a try!
Thank you very much for the information, Julia! I need to look around to see if I can find some ready-made kombucha so I can try it before I start buying the stuff to make it.
You’re welcome! Most grocery stores carry kombucha now – definitely a great idea to try store-bought kombucha first, prior to brewing it yourself 😀
This is an a great guide. Reading it was clear and to the point, and it answered a lot of questions I have had about brewing kombucha. I plan on making my own batch soon so I will be saving this page. Thanks so much!
Katie
I’m so happy to hear it’s a helpful guide for you! Let me know if you have questions any time!
Hi!
Thank you for your post! I have some questions… I hope you can help me!
It took about 15-25 days for my Kombucha to grow. I think it was too close to the stove in the beginning, I moved it to a cooler place around the 15th day. When I checked it around the 35th day, I had 3 layers. I was too scared to taste the liquid. It has been 40 days now. I finally got the courage to taste it- it is very vinegar-like. I think it is good. There is no mold, no green spots. The babies are very white and thin. However the mother is very thick (1/2 inch) and a little brown on some side spots.
What do I do now? Do I make a new batch of tea&sugar, put a baby scoby, wait 8 days, then drink it normally? And then follow the steps for the 2nd fermentation process?
Can I leave all the other scobies in my initial batch? Should I make a new batch for the hotel? Or do I keep it as is? So, whenever I need a scoby I take one with some liquid (even though it is very vinegar-like) that has been there for over 2 months?
I am scared to get sick. Or to ruin it. Please reassure me!
Thanks!
I am making komucha for the first time. I bought a hydrated one on line and it’s brewed for 8 days , followed all the previous directions. The scoby is still on the bottom of my jar. I tasted the tea and it’s still really sweet. Is my scoby working? Please help. I really want this healthy drink for my family and I.
Hi Sable, does your kombucha taste vinegary at all? Or just sweet? It could be that your SCOBY needs more time to ferment, because it could still be in shock from travelling. I find the first batch with a new-to-you SCOBY sometimes takes longer than sequential batches. I’d say continue to let it brew a couple of more days and see how it tastes. Also, it’s normal for your SCOBY to settle at the bottom for the first batch – typically the new SCOBY forms at the top, while the original SCOBY stays at the bottom. Is there a new SCOBY forming at the top of the liquid?
Hi there, I was given several scoby-jacks, and I’m ready to start my own batch but I have some questions. My husband is sugar-free (by choice) and is concerned about drinking the kombucha and all the sugar. I was instructed to do two fermentations, once with plain tea, and once with flavorings. What can you tell me about the sugar content after two fermentation cycles? Also, I was instructed to use only plastic tools with the processing and fermentation (i.e. straining with plastic mesh, funneling with plastic, and bottling with glass bottles and plastic tops), so can you shed some light on that for me? Lastly, how do you ‘seal’ the finished product? Just tighten the cap?
Thanks!!
Hi Allison,
First off, welcome to the wonderful world of kombucha brewing! To answer your question regarding sugar content: The residual sugar changes per batch based on several factors: 1. Length of brew time 2. Temperature of the brew 3. The health/hunger of the probiotics 4. Amount of sugar you add for both the first and the second fermentation. With that said, I don’t consume cane sugar, myself, but I do drink kombucha every single day. I’ve never measured the amount of sugar that’s left in my brew, but I imagine it is less than store-bought kombucha, which usually has roughly 4 grams per 16 ounces (minimal). If you’d like, you can make Jun instead of Kombucha, which is brewed in the exact same way, except you use a different type of SCOBY, and you use honey instead of sugar. Personally, I much prefer the flavor of kombucha 🙂
The plastic suggestion is valid, because some older metal strainers leech metal into the kombucha, although most metal strainers are now made with stainless steel, which is fine to use with kombucha. It’s what I use, in fact, but if you’re concerned, stick with plastic. Yes, definitely bottle using sterilized glass bottles with plastic/rubber caps. I use flip cap bottles, which I note in my post. Unlike beer, you don’t need to seal the bottles with a special sealer. Simply twist the cap on, or insert the flip cap.
Let me know if you have any other questions!! I hope you have lots of fun brewing your ‘bucha and feel free to reach out any time! Happy brewing!
Thanks for the additional insight! I’m looking forward to starting my first brew, but I keep hitting obstacles! I’ve been told that the water I use is very (VERY) important, that only a trusted source of reverse osmosis water was to be used, not purified drinking water, not distiller, and certainly not tap (even boiled tap) water. We have a Walmart nearby that sells Primo brand water in 2, 3, and 5 gallon jugs. According to the Primo website their water goes through an extensive filtration process, including RO, then minerals are added back in for “taste.” Would Primo water be acceptable to use?
It’s great that you’re taking such a detailed approach! From what you have described, using the Primo water should work marvelously. It sounds like you’re taking all the right steps to brewing some excellent kombucha! Best of luck!
Do you have to seal the jars after the initial fermentation before the second fermenation? And how do you sanitarily ‘cut the scoby’ after the first ferment? Do you put the original scoby BACK in the kombucha after you cut pieces off? How do you store the pieces you cut off so they can be used by friends?
Hi Katie, kombucha scobys always need to breathe, so avoid sealing them – always keep them covered with cheesecloth/towel bound by a rubber band.
I don’t cut SCOBYs, but I have heard some people do. I simply peel the layers off. To do so, wash your hands well, and have one or two sanitized bowls ready by you. Remove the scoby from the jar using your hands, peel the amount of layers off you would like, and place them in a bowl.
Place at least one SCOBY back into the jar you’re using for brewing so that you can continue brewing. Place the SCOBY(s) you’re giving away in large ziplock bags and add some of your kombucha liquid to the bag – enough to keep the SCOBY very hydrated. Seal the bag(s) well and maneuver the SCOBY so that it lays flat. When you transport it to the person you’re giving it to, try to keep it flat and tell the person to begin a batch right away. SCOBYs don’t like to be confined without air, so it’s best to get the brew going ASAP.
Let me know if you have any more questions and good luck!
I discovered a local store has a starter batch and I’m thankful to find your detailed instructions on-line. I’m also going to start juicing. Is it ok for fresh juice to go through the second fermentation for 3 days? Or does it need to be pasteurized/store bought? Thanks and good luck with the book!
Hi Christina! Fresh juice would actually work better than store-bought. Good luck and happy brewing!
Thank you so very much for your quick reply!! I soooooo want to be successful at this. And not have to get another SCOBY dude.
This is my first time brewing kombucha and I am trying to make it fizzy so during the second fermentation, should I cover the bottles with an air-tight lid, or a breathable cloth?
Hi there! You’ll need to seal the bottles for secondary fermentation in order to make the kombucha fizzy 🙂 Fermentation produces gasses that when trapped in a bottle create pressure, giving the drink the effervescence. Let me know how it turns out!
Hello! I just finished my first initial brew of my first ever kombucha. But my SCOBY does not appear to have grown at all. Is he sick? I live in FL, pretty hot and humid here, I was taught to let the first brew go for 7-8 days. Any thoughts on where I went wrong?
Hi Karen! Hmmm.. 7 to 8 days should have done the trick. How much water, sugar and tea did you use? Where did you get your SCOBY from? Do you know roughly what temperature the brew was on average? SCOBYs are pretty resilient – it could just be in shock, and may still be completely fine!
Oops the rest of my post disappeared (twice!) Anyhoo, I was taught to steep 4 bags if tea in a quart of water, bring to room temp, add a cup of sugar, 2 more quarts of room temp water, SCOBY dude, cover with cloth & Lid and let brew for 7-8 days. I let him brew for 8 . I do live in FL but we did have a few cool days last week. I wonder if my house got too cool…low 70’s during the day – mid 60’s at night.
THANK YOU so much, any and all advise is welcome!!
Karen
All of that sounds perfectly fine except for maybe the tea-to-sugar ratio and the lid part. for a quart, I would have done more like 1/2 cup of sugar, although I would say it’s better to have added too much sugar than too little, so I can’t be sure this was the issue…
Was the brew able to breathe, or was the lid air-tight? If the lid was air-tight, I’d say that’s the issue, as kombucha needs to breathe in order to ferment. I typically cover my jugs with cheesecloth and then bind the cheesecloth with a rubber band. But the rest of what you described sounds like it should have worked. You’re very welcome, and I hope your SCOBY bounces back!
THANK YOU THANK YOU THANK YOU, I am running to the kitchen to take the lid off my second batch right now!!!!
If for whatever reason, my SCOBY dude does not survive, do you have any recommendations for where to buy a new starter culture?
I received mine in a class. But looking at pictures online, it really doesn’t look the same, so I am questioning the quality of my dude.
Again, thank you for your time!
Karen
No problem at all, Karen! I’m glad to be of help! And huge kudos to you for starting your own kombucha – you’re going to love it! I got my SCOBY from here: http://www.organic-kombucha.com/kombucha_starter_kit.html, and have been using the same one ever since. I also trust this site: http://www.culturesforhealth.com/kombucha-tea-starter-kit.html. You may be able to get another SCOBY from your friend in class, but if it looks questionable, don’t chance it. If you do end up ordering one online, just be sure you start a batch right away because SCOBYs don’t like hanging out in plastic, I’ve come to realize 🙂 GOOD LUCK and feel free to give me a shout if you have any more questions!!
Thank you AGAIN!!! I think a good idea will be to PH test my first batch. That will give me an idea if it worked….do you agree?
No problemo! A Ph test would be a good idea, but I would also give it a little taste test (if you trust it enough). If it still tastes like sweet tea, it didn’t work, but if it tastes more vinegar-y, then it may have brewed a little in spite of the fact the SCOBY didn’t grow. How is your SCOBY looking now? Is it laying flat on the surface of the tea?
Hello again!! You have been incredibly helpful! No the SCOBY has sunk to the bottom and kinda folded over. For my first batch I have already added some strawberries for a second brew so can’t tell if its sweet from that or if it didn’t work . Its delicious though! Thank you once again!
Great clear instructions!
Ok so I have read another how to blog before this one & she said to keep it in the light (but not direct sunlight) & keep it there for 2-3 weeks. However she didn’t mention anything about the mold or being cautious which worries me. So a closet or pantry WILL be fine to keep it in??
Hey there! Everything I’ve read about brewing kombucha has said putting it in sunlight kills the bacteria. This is why many kombucha companies use the dark, non-transparent bottles for bottling the kombucha – to ensure the bacteria doesn’t die. I have always brewed mine in a dark room for 7 to 10 days (I truly think 2 to 3 weeks is far too long unless your house is below 65 degrees F. It will end up too strong to drink and/or the probiotics will starve). I would say go with your instincts..if you trust the source you read, you can give it a try, but I would caution against sunlight as well as over-brewing. You definitely do need to keep an eye out for mold, although as long as you follow all instructions regarding sanitation, the risk of mold is very, very low. Good luck and thanks for your interest!
Hi! Do you take the scoby out after the first brew, or leave it in during the flavoring process? Thank you!
Hi! I’ve been taught to never flavor the scoby. Brewing is good for the scoby, flavor (juice, fruit, etc.) is not. I’m interested to see what other people say!
Hi Allison. I never recommend for people to combine their SCOBY with any other ingredients besides tea and sugar. I state in my instructions that for secondary fermentation, you mix brewed kombucha and juice/fruit together and leave the SCOBY in its jar. Thank you for your input – it’s always good to have a second pair of eyes when it comes to brewing something as sensitive as kombucha.