
This post may contain affiliate links. Read our privacy policy.
An easy 4-Step tutorial on how to make Instant Pot Coconut Milk Yogurt. This goof-proof method results in the best tasting dairy-free vegan yogurt, and only requires 3 ingredients!
This post was a long time in the making, and I’m so thrilled to finally be sharing it with you all!
Not only have I made countless batches of coconut milk yogurt using a variety of methods (some epic fails, some so so, and some fabulous), but I have a long history of fermenting things.
First things first, I began making yogurt, kefir, kombucha, ginger beer, and more way back in 2010. In fact, I wrote my first cookbook, Delicious Probiotic Drinks on making naturally fermented beverages (including yogurt) at home.
Suffice it to say, fermentation has been one of my cherished hobbies for upwards of a decade. More recently I dove headfirst into the wonderful world of non-dairy coconut milk yogurt. To make a long story short, the pressure cooker method is my favorite, and it produces consistently great results.
So in this blog post, I have included everything you need to know about making homemade coconut milk yogurt. From a 4-Step process to how long to make yogurt in the Instant Pot, troubleshooting potential questions or issues, to what type of coconut milk to use in order to achieve the best result, it’s all right here!
Let’s get after it!
What You Need For This Recipe:
You only need a few basic tools to make dairy-free yogurt at home. Here are the items I use:
- Instant Pot (or pressure cooker of choice. I use a CrockPot Express)
- Probioic Capsules (I use 6 capsules)
- Full-Fat Canned Coconut Milk (I use 2 cans)
- Coconut Sugar (I use 1 tablespoon. You can also use cane sugar)
- Large Glass Jars (for storing) (one 32-ounce jar is enough)
How to Make Instant Pot Coconut Milk Yogurt:
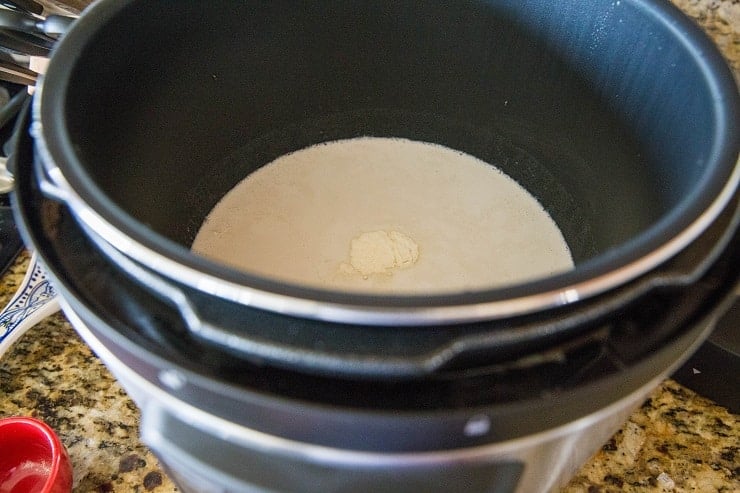
Step 1: Boil the coconut milk and allow it to cool to 115 degrees F. Press “Boil” on your Instant Pot and allow the coconut milk to boil for 30 seconds to one minute.
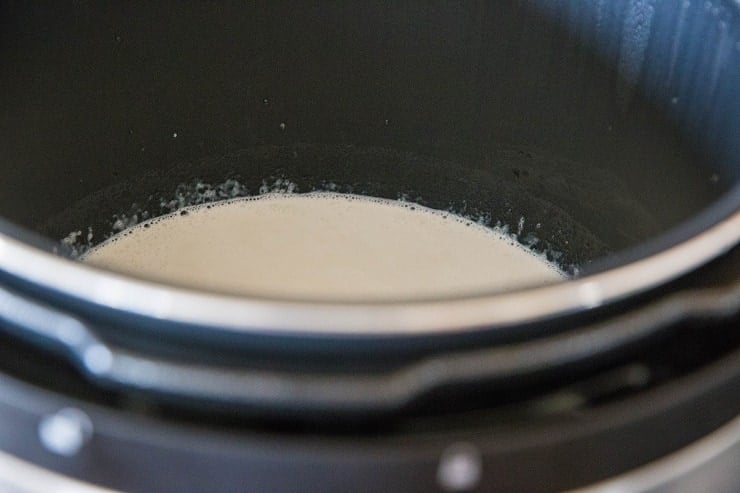
Then, keeping the Instant Pot covered, allow the coconut milk to cool for 1 hour. After 1 hour, check the temperature of the coconut milk. You want it to be somewhere between 110 and 115 degrees F.
This process ensures there is zero bad bacteria going into the process and also allows you to get the coconut milk to the correct temperature for fermentation.
Step 2: Add Probiotics and Coconut Sugar – When your coconut milk has cooled to the 110 to 115 range, open your probioic capsules and pour the powder into the instant pot with the coconut milk.
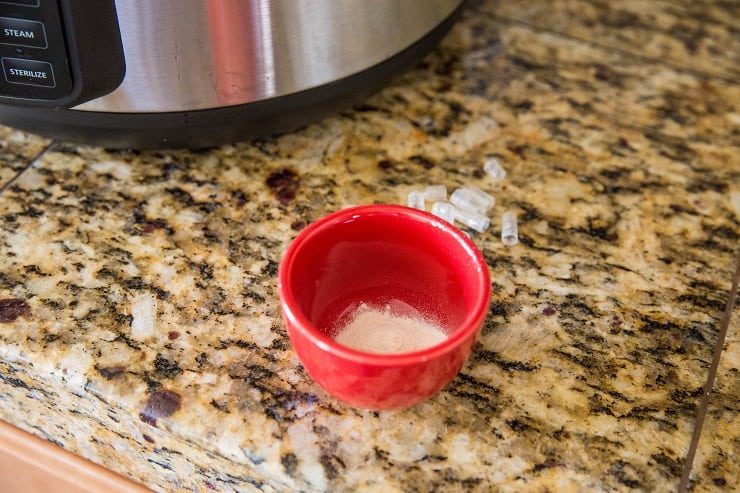
Use a wooden spoon to stir the mixture well until most of the clumps of probiotics are out. It’s perfectly fine if you can’t get the powder to dissolve completely, but the yogurt will be smoother the better it has dissolved.
Similarly, add the coconut sugar and stir well until it has dissolved. We add coconut sugar to ensure the probiotics have enough food to feed on during the fermentation process so that they don’t die.
Step 3: Ferment the yogurt – Press “Yogurt” on the Instant Pot and set the time for 12 hours. Many pressure cookers (including my Crock Pot brand pressure cooker) will default to 8 hours and not allow you to select a longer time than 12 hours, but you want the yogurt to go for a minimum of 24 hours, ideally 48 hours.
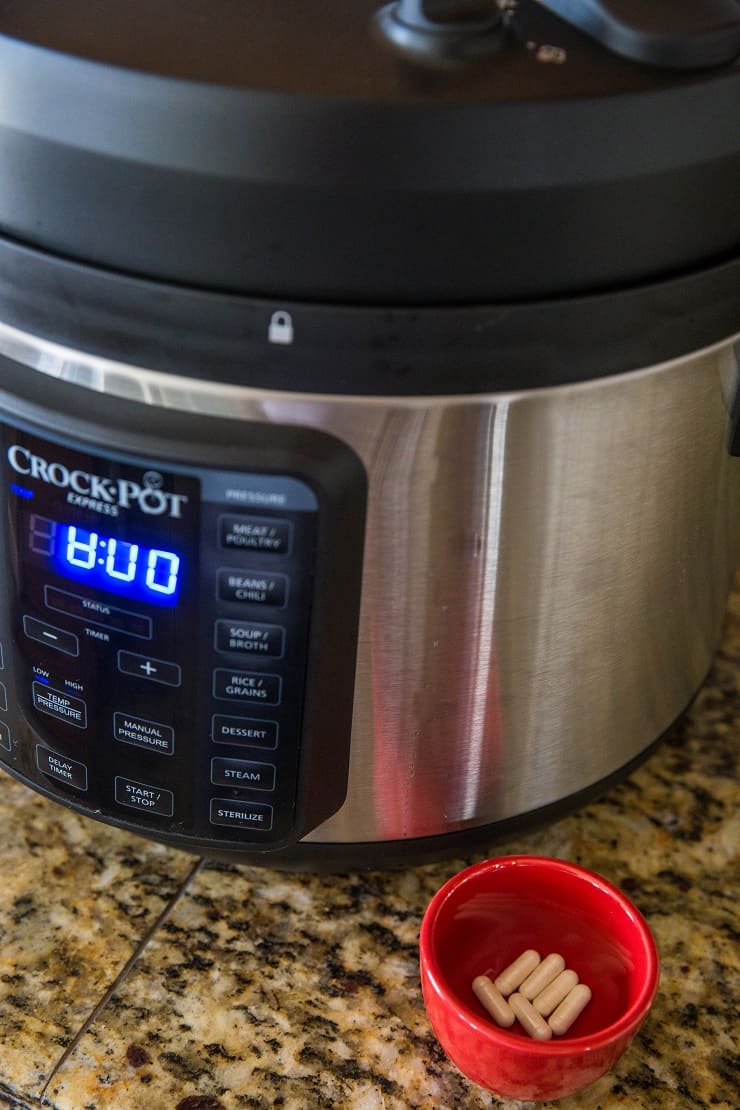
Once the initial 12-hour session is over, perform an additional 12-hour run by pressing “Cancel” then “Yogurt” and dial the time up to 12 hours again. If desired, continue this cycle for up to 48 hours. Meaning, you will run four 12-hour cycles.
NOTE: If your Instant Pot or pressure cooker does not have a Yogurt function, you can follow this tutorial on How to Make Instant Pot Yogurt Without the Yogurt Button.
Step 4: Refrigerate. Transfer yogurt to a sanitized jar and refrigerate. This process helps thicken the yogurt and slows the fermentation of the probiotics so you’re left with happy, healthy probiotics that will help boost your gut microbiome.
Why Make Yogurt in an Instant Pot?:
If you’ve ever made homemade yogurt or really anything fermented, you know it’s important to maintain a specific temperature for a certain period of time. For best results, yogurt should maintain a temperature of 95 (at the very lowest) to 115 degrees F.
Making the yogurt in a pressure cooker ensures the temperature stays at an even 110 degrees F for the amount of time you specify.
In addition, making yogurt in a sealed container ensures no random bad bacteria contaminate the yogurt.
But What About The Jar Method?:
I have seen recipes floating around the internet that recommend you pour a can of coconut milk into a sanitized jar and mix it up with 2 non-dairy probiotic capsules and leave it for a day or two at room temperature.
Theoretically, this method could work if you keep your home very warm. BUT, I’ve tried this method twice and both times it did not work. The first time, the probiotics simply did not grow and the second time, the mixture became rancid (meaning it somehow became contaminated).
I see three potential issues with this method. First, the potential for contamination, Second, probiotics need food in order to grow, and that food is sugar (coconut milk is very low in carbs, so if the probiotics do grow, they can quickly die when they run out of food), and Third, the lack of temperature control yields high potential for failure (meaning you can easily end up with…coconut milk).
I’m not telling you not to try this method, but based on my experience, it does not work. Regardless, I find the pressure cooker method to be easy, consistent, and goof-proof.
How Long Should I Make Yogurt in an Instant Pot?
So…here’s the weird thing. Pressure cookers that have a Yogurt setting will max out at 12 hours. While it is possible to make yogurt in 12 hours, it doesn’t turn out thick and creamy when you use coconut milk…it will stay the consistency it went in, meaning thin.
For best results, allow the yogurt to go for 48 hours. To do so, you will need to run four 12-hour cycles in your pressure cooker. At the very minimum, I recommend 24 hours, but 48 is much better in terms of getting your yogurt to be thicker.
What Type of Coconut Milk Should I Use?:
In order to achieve a thick non-dairy yogurt, you’ll need to use full-fat canned coconut milk that includes an emulsifier like guar gum. Don’t use coconut milk that comes in a carton. I tried this and not only did it taste awful, but it became gooey instead of thick. I was also unsure if the probiotics actually grew.
That said, I prefer using coconut milk that is pure coconut milk without gums or emulsifiers. I use Native Forest Simple Coconut Milk, which I buy in bulk on Amazon or from Whole Foods.
What Type of Probiotic Capsules Should I Use:
I use MegaFood MegaFlora Probiotics, which contain 14 different strains of probiotics. I have found these capsules provide very consistent results. If you try this method using a different type of probiotic, please leave a comment letting me which one you used, as I’m sure other people will find this information useful!
I recommend using a lactobacillus probiotic capsule, versus a soil-based probiotic or Saccharomyces Boulardii because lactobacillus strains seem to work better in my experience. I have tried making yogurt using both spore-based probiotics and Saccharomyces Boulardii but it didn’t work.
Does that mean it can’t work? Not necessarily. I just recommend using the method that seems to consistently work, which is using lactobacillus strains.
Can I Use Any Other Non-Dairy Milk?
So…you can try…but I don’t recommend it. As I mentioned above, I tried making yogurt (in the pressure cooker) using a carton of coconut milk instead of canned coconut milk, and the result was super lackluster. I believe the same would result using a carton of almond milk, cashew milk, rice milk, etc.
Is it possible to make vegan yogurt using a different non-dairy milk? Absolutely…but if you’re itching for almond milk yogurt, for instance, I would just buy it from the store. It requires a lot, a lot of love (added emulsifiers and sugar) in order to get it to be remotely delicious.
Is Coconut Milk Yogurt AIP-Friendly?
If you follow the Autoimmune Protocol (AIP diet), you will need to go with the Native Forest Simple brand of coconut milk, as you are not supposed to consume gums or emulsifiers on AIP. As long as the coconut milk you use is straight coconut milk, then coconut milk yogurt is AIP compliant.
Is Coconut Milk Yogurt Vegan?:
As long as you use probiotic capsules that include probiotics that were not grown on dairy, your coconut milk yogurt will be vegan. Note that many probiotics are grown using dairy, so you’ll need to do a bit of legwork to make sure your probiotics are indeed vegan.
Is Homemade Vegan Yogurt As Thick As Store-Bought?:
When you use a canned coconut milk that does not contain gums or emulsifiers, the yogurt does not turn out as thick as store-bought yogurt. Gums and emulsifiers prevent separation and help maintain creamy consistency, so your yogurt will turn out thicker if you use gum/emulsifier-containing canned coconut milk.
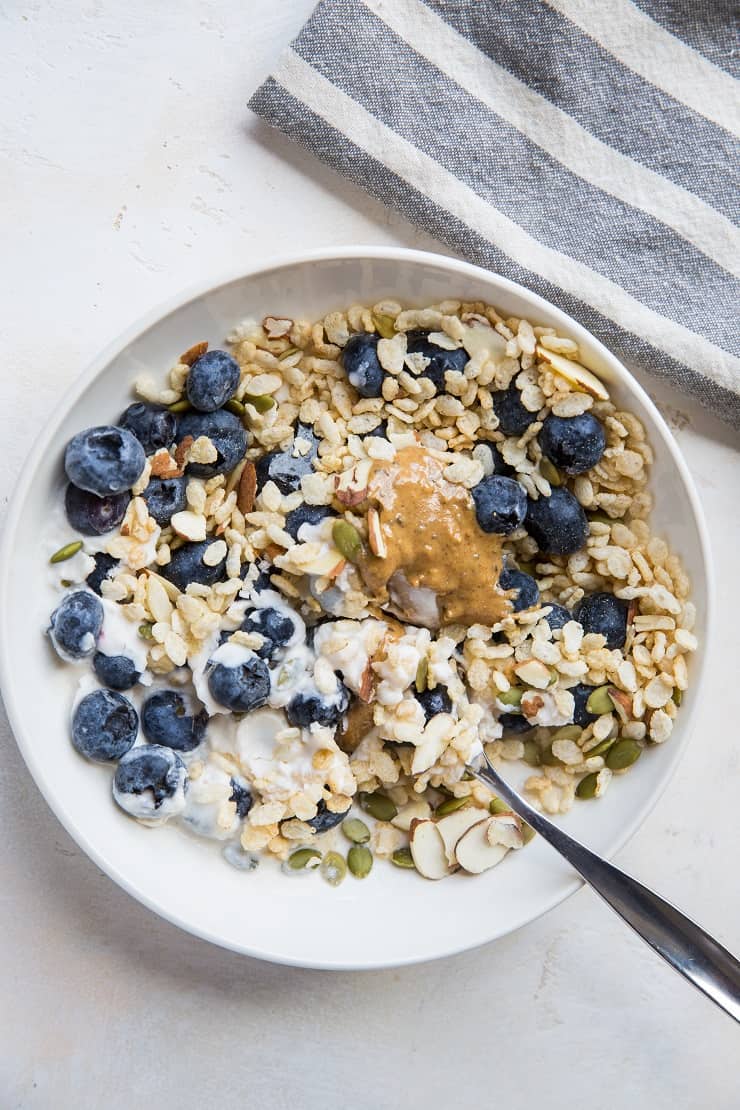
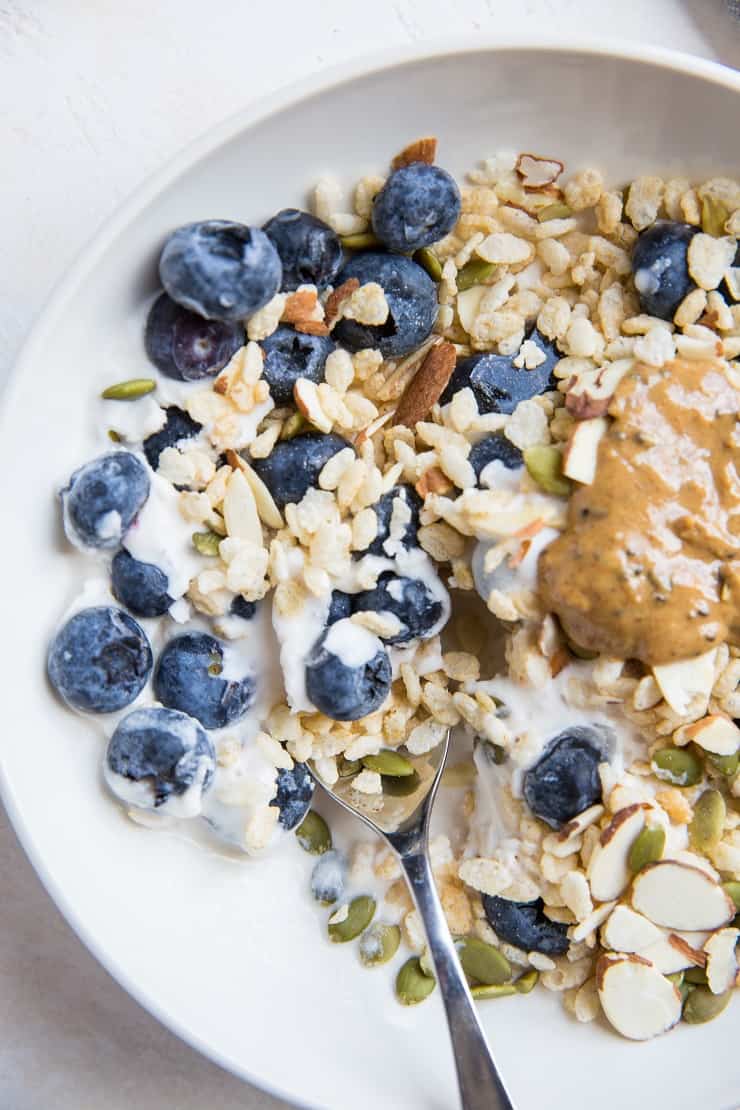
Serving Suggestions:
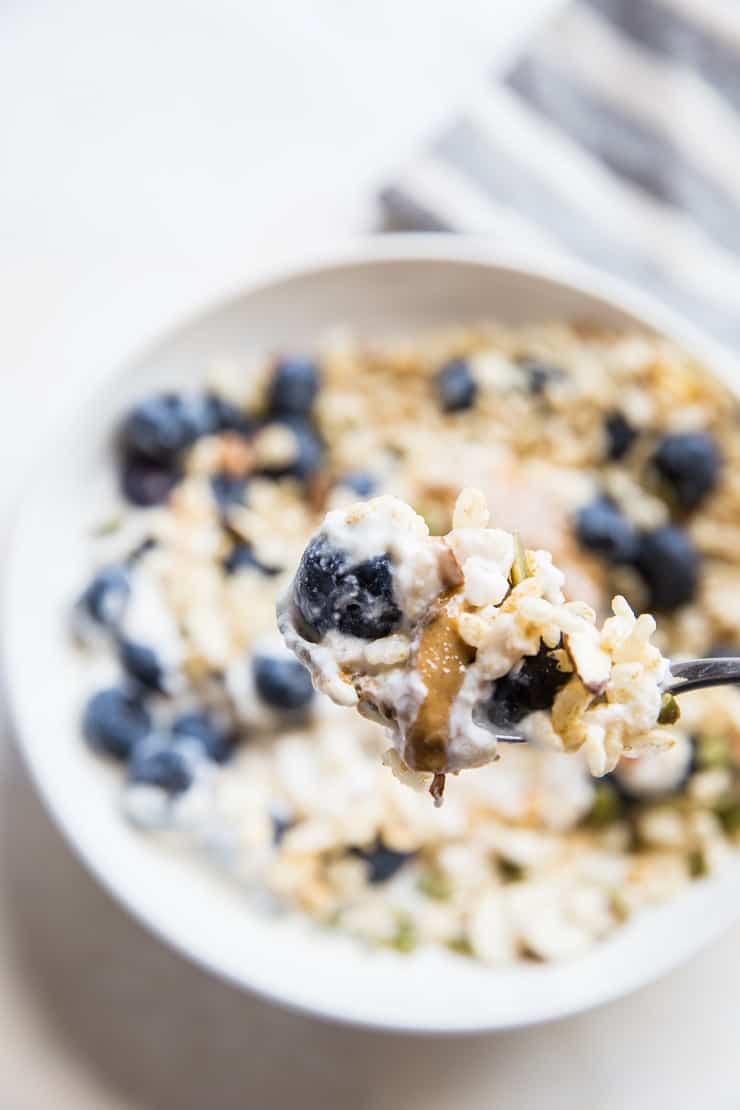
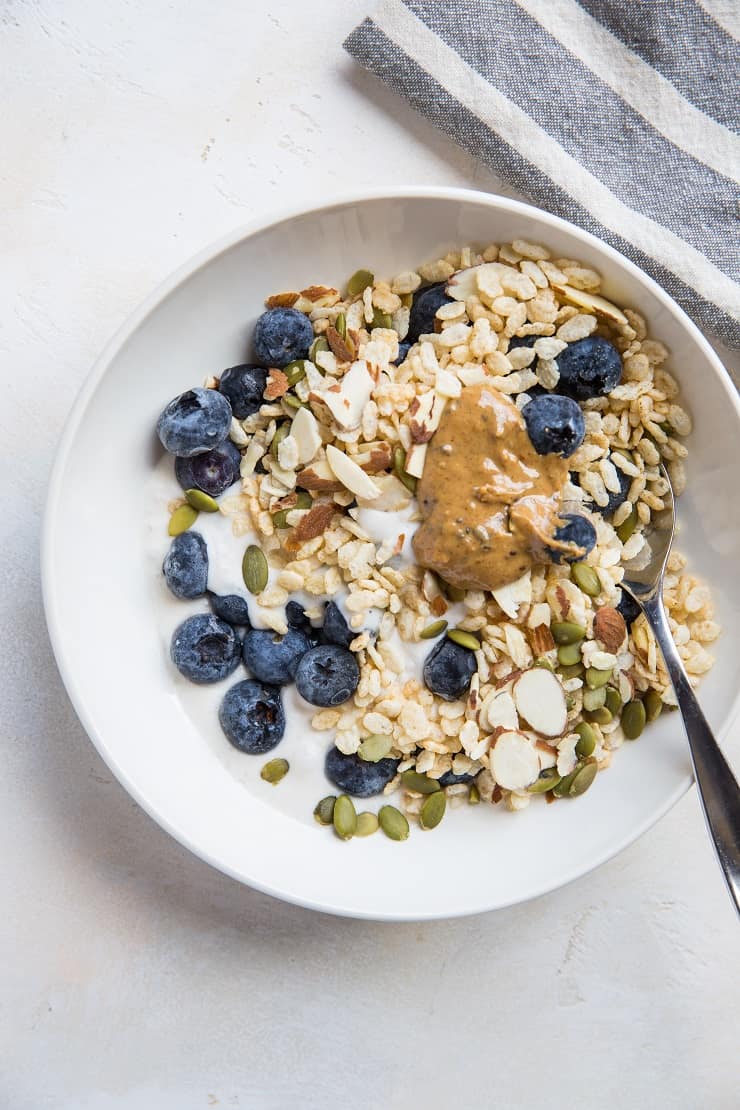
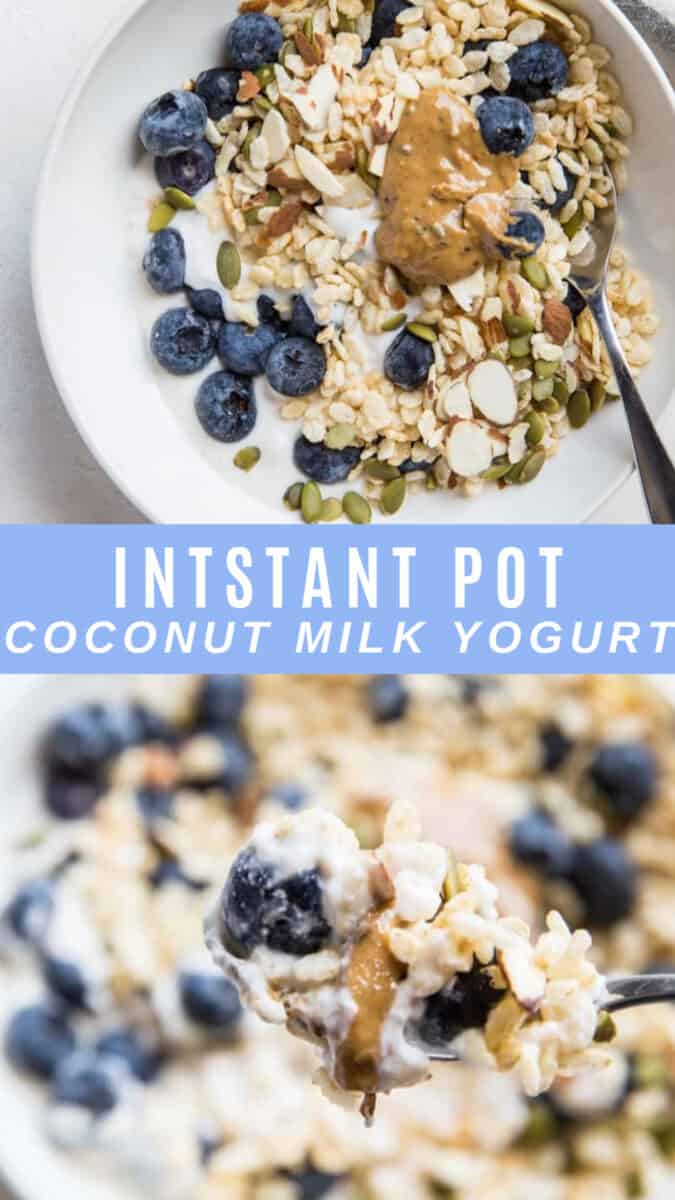
I absolutely love eating coconut milk yogurt with fresh blueberries, puffed rice cereal, raw pumpkin seeds, slivered almonds, and a scoop of nut/seed butter. Here are some ideas from the blog where you can put your coconut milk yogurt to great use:
- Roasted Peach, Cherry and Walnut Yogurt Parfaits
- Grilled Red Curry Shrimp Bowls with Squash and Basil Yogurt Sauce
- Crispy Cauliflower Cakes with Yogurt Dipping Sauce
- Gluten-Free Yogurt Pancakes
- The Ultimate Acai Bowl
- Sweet Potato Porridge Breakfast Bowls
- Coconut Chia Seed Pudding
Enjoy Instant Pot Coconut Milk Yogurt, and let me know what you think!
My cookbook, Paleo Power Bowls, is now available! CLICK HERE to check it out. Thank you for your support!
If you make this recipe, please feel free to share a photo and tag @TheRoastedRoot on Instagram!
Instant Pot Coconut Milk Yogurt
Ingredients
- 2 15-ounce cans full-fat canned coconut milk*
- 6 probiotic capsules
- 1 Tbsp coconut sugar
Instructions
- Plug in your pressure cooker and press "Boil." Bring the coconut milk to a full boil and allow it to boil for 30 seconds to 1 minute. Leaving the pressure cooker covered, unplug it (or turn it off) and allow the coconut milk to cool for one hour.
- Take the temperature of the coconut milk. Once it is in the 110 to 115 degree range, break open the capsules of probiotics and add the powder in. Discard the outer shell of the capsules. Add the coconut sugar and stir the mixture well using a wooden spoon until the powders have dissolved.
- Secure the lid on the pressure cooker and press "Yogurt." Adjust the time up to 12 hours and allow it to run its cycle. Once the 12 hours is up, press the "Yogurt" button again, and have it go for another 12-hour cycle. Repeat this process for a total of 24 to 48 hours, depending on how long you want the yogurt to ferment. I recommend 48 hours.
- Once the yogurt is finished, stir it well and transfer it to a sanitized glass jar. Seal the jar and refrigerate until chilled. Keep yogurt for up to 1 week in the refrigerator. Note that yogurt will thicken as it cools in the refrigerator.
Nutrition
Nutrition information is automatically calculated, so should only be used as an approximation.
Like this recipe? Rate and comment below!


Well that was a LONG wait for a brownish runny product with a layer to skim off the top? Is this normal? It has been smelling up the house for a couple of days and I am not sure if it is rancid or if that is normal.
Followed the recipe … Thai canned reg milk, sterilization, one pot yogurt button for 48 hours.
It is currently chilling out in the fridge – but don’t want to make anyone sick. How will I know if gone bad or how it is supposed to be?
Hi there,
To me it sounds like the yogurt is bad so I wouldn’t recommend giving it to anyone. My apologies it didn’t work out! What you’re describing is something I haven’t experienced with this recipe so I’m not sure what happened. Nevertheless, I sincerely apologize and I would say throw it out.
I was so nervous about making this. I bought an Instapot just to make this yogurt. I have a designated insert and seal just for yogurt to prevent contamination.32 hours is my sweet spot and even though the spell was strong it tasted amazing. I poured it in a nut bag and let the cleat liquid run off for a few hours in the fridge to thicken in up. Thank you for this recipe. I had tried another method of leaving it on the counter. But it never worked…. my house is too cold!
Thanks so much for reporting back and for sharing your tricks, Heather! As you’ve experienced, fermentation isn’t always an exact science so I’m thrilled you were able to get it to work for you 🙂 xo
Hi, is this low histamine? I’m thinking not, since it has to heat for a long period of time. Thank you, Jen
I don’t think it is either. I’ve read a lot of probiotic-containing foods are not low histamine.
When making a second batch, how much of the original yogurt or ‘mother’ do you recommend using and how/when in the process would you add it in? I didn’t see this info on your page. Thanks for the recipe.
Came out brown and smelling like absolute death. Must’ve gotten contaminated at some point, but not sure where (I meticulously cleaned/boiled everything). It’s a good thing I pulled it out at 26 hours and didn’t wait another day. Guess I’ll have to try again later.
Can this be done with coconut cream (aroy d white box) and a pure fresh coconut milk yogurt as a starter? The pro b we use is just thrive and it’s soil based so I’m unsure if this would work, don’t want to waste those expensive capsules.
Hi there! I’ve tried making yogurt using a soil-based probiotic and it didn’t work – I recommend a Lactobacillus probiotic with multiple strains. It should work with coconut cream and coconut milk yogurt as a starter! I’ve never tested it, but based on my experience making yogurt, using yogurt as a starter is the easiest/best way 😀 Just be sure you don’t boil the yogurt before adding it. xo
I’m looking for nutrition information on this yogurt. Is that available?
This went horribly. After the 48 hours I opened the lid and my yogurt was still watery and had gone completely bad. What could I possibly have done wrong? It’s so disappointing to wait this long and put in this much effort.
Hi Hunter,
What type of coconut milk did you use? Did you heat the coconut milk before putting it on the yogurt setting? As mentioned in the post, the yogurt thickens after refrigeration – did you try this? I also mention it never gets quite as thick as store bought without adding an emulsifier like tapioca flour.
Yes, I heated it beforehand. I use the Thai Kitchen brand. And I couldn’t put it in the fridge it was very rotten. Smelled absolutely horrible and had turned brown on the top. I can’t even get rid of the smell with 1 dishwasher run.
Agh that’s gross…I honestly have no idea what could have happened other than there being an initial contamination. I’ve made this exact recipe 4 times and have had the same result each time. I’m truly sorry it didn’t work out for you! I wish I had a better answer as to what happened, but the only thing I can think of is there was bad bacteria present from the onset and your probiotics didn’t work 🙁
Since you can’t use Guar Gum on AIP, would you be able to use a bit of organic gelatin?
HI Judy,
Oooh, that’s a great idea! I haven’t tried it yet. You would want to add the gelatin while the yogurt is warm and make sure you immediately whisk it very quickly or else it will clump up. As for the amount, I’m not sure…I would start with 1 teaspoon and go from there. Let me know if you try it! xoxo
Hi Julia, I’m new to your site. This looks great. Do you think you could use Stevia rather than coconut sugar or is the coconut sugar needed for the process of fermentation? I’m starting to try the AIP diet for Underactive thyroid/ auto immune symptoms, so I’m excited to find yummy recipes for my journey 🙂
You can make it without sweetener if you’d like. I wouldn’t advise using Stevia, as Stevia likely wouldn’t do a great job of feeding the probiotics. 😀
Ooh, that’s a great question, Krista! I wasn’t sure, so I googled it and found this tutorial: https://www.sparklestosprinkles.com/how-to-make-instant-pot-yogurt-without-the-yogurt-button/ I’ll add that to my post as well. Hope you enjoy! xo
I don’t have a yogurt button on my instant pot. Do you think the porridge button would be similar?