Servings: 6 Servings
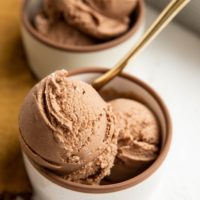
Dairy-Free Chocolate Ice Cream
The BEST dairy-free chocolate ice cream recipe that you'll keep returning to over and over! This simple yet lusciously rich and delicious homemade ice cream is a chocolate lover's dream.
Ingredients
- 2 (15-oz) cans full-fat coconut milk
- 3/4 cup pure maple syrup
- 4 Tbsp unsweetened cocoa powder*
- 1 tsp pure vanilla extract
- ¼ tsp sea salt
Instructions
- Freeze the bowl of your ice cream maker at least 12 hours (ideally 24 hours or longer) before making the ice cream. Skip this step if you don't own an ice cream machine.
- Add the canned coconut milk and pure maple syrup to a saucepan and heat it over medium heat on the stove top. Stir and heat until the coconut milk is completely creamy. If your house is on the chilly end, there will be separation between the cream and water. We want the milk to be well-combined.
- Once the coconut milk and pure maple syrup are combined, whisk in the cocoa powder and sea salt. Continue whisking and heating until the cocoa powder has dissolved. It’s fine if there are a few small chunks of cocoa powder left but whisk assertively to get most, if not all, of the cocoa powder to dissolve.
- Once the cocoa powder has dissolved, remove the saucepan from the stove top and whisk in the vanilla extract.
- Transfer the ice cream base to a freezer-safe container such as a tupperware dish or large bowl and refrigerate until completely chilled. You can speed up this process by freezing the ice cream base and stirring it every 10 minutes or so until it’s cold. Note: If you aren't using an ice cream machine to prepare the recipe, simply transfer the ice cream base to a freezer-safe container, then freeze until solid.
- When you’re ready to make chocolate ice cream, plug in your ice cream maker and place the frozen bowl inside. Pour in the chocolate ice cream base, insert the paddle, and secure the lid (or follow the instructions on your specific ice cream maker). Turn the ice cream maker on and allow it to churn until the ice cream is thick and the maker begins to bog down slightly. This takes about 15 to 20 minutes for me.
- Serve ice cream immediately for a soft serve consistency. To be honest, I typically stop here and just enjoy it as soft serve ice cream due to how luscious and creamy it is. For regular ice cream consistency, transfer the ice cream to an airtight container (many people use a loaf pan or a tupperware container) and freeze until it has completely set up, about 4 to 8 hours.
- When you’re ready to eat the ice cream, allow it to thaw at room temperature before you attempt to scoop it. Coconut milk ice creams take much longer to thaw than regular ice cream so have patience while it does its thing.
- Scoop ice cream into bowls and enjoy! You can add any ice cream toppings to your heart’s delight.
Notes
*If you’re a dark chocolate lover, increase this amount to 5 to 7 tablespoons. I wouldn’t use more than 7 tablespoons of cocoa powder for the optimal texture, as it will begin to turn grainy.
Nutrition
Serving: 1Serving (2/3 cup), Calories: 355kcal, Carbohydrates: 32g, Protein: 2g, Fat: 25g, Saturated Fat: 20g, Sodium: 135mg, Fiber: 1g, Sugar: 28g